Putting the Selection Inspector to rest: Difference between revisions
From ParaQ Wiki
Jump to navigationJump to search
(→Q&A) |
(→Q&A) |
||
| (3 intermediate revisions by 2 users not shown) | |||
| Line 26: | Line 26: | ||
* These control the display properties for the selection in the active view. | * These control the display properties for the selection in the active view. | ||
* Any change to the selection color or label text properties i.e. label color, font, etc., are saved in settings so that they will be used as the default next time. | * Any change to the selection color or label text properties i.e. label color, font, etc., are saved in settings so that they will be used as the default next time. | ||
* Clicking the ''gear'' button will popup a modal dialog that will allow users to change advanced properties e.g. font size, font color, selection-wireframe size, etc. all of which will be saved to settings so they will be used by default the next time a new selection is created and preserved across multiple ParaView sessions. | |||
==Follow-on Actions== | ==Follow-on Actions== | ||
| Line 37: | Line 38: | ||
2. How does one ''invert'' a selection? | 2. How does one ''invert'' a selection? | ||
: We can add a button in the Follow-on Actions to '''Invert Selection''' the current selection. | : We can add a button in the Follow-on Actions to '''Invert Selection''' the current selection. | ||
3. What about making it easier to define selections e.g. "max of variable Temp"? | |||
: That's a separate feature which can be accommodated after this refactoring. We will simply be updating the '''Create Selection''' section with additional capabilities. | |||
4. How will I be able to label the points and cells of a selection now? | |||
: The "Labels" combo-box will open up into a menu that allows checking multiple items. We can allow users to check up to 1 cell and point array at same time. | |||
5. Will the edit dialog be available without python if I want to inspect selections? | |||
: Yes. However in that case, users can only a few types of selections (those that won't require queries). | |||
Latest revision as of 09:13, 2 July 2013
This document provides a design for removing the Selection Inspector and upgrading the Find Data Dialog to provide all capabilities currently provided by Selection Inspector.
User Interface
- The Selection Inspector will be removed from the ParaView application in its entirety.
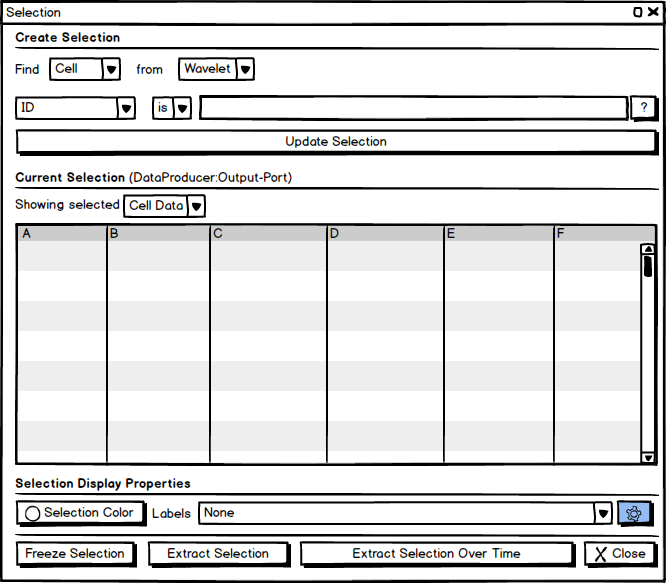
- The Find Data Dialog will be updated as shown in the mock-up above. It is a non-modal dialog with ability to be docked in the UI (possibly).
- There are 4 components to this dialog:
- Creating/Defining the query/selection.
- Viewing the currently selected elements.
- Controlling the display parameters for the showing the selection in the active view.
- Follow-on actions i.e. logical next steps after making a new selection e.g. extract selection, etc.
Create Selection
- This remains same unchanged from the Find Data Dialog in 4.0 release, for the most part. User selects the data-producer and type of elements to select, then defines the selection criteria and then hits "Update Selection".
- New option will be added to make a selection given a location.
Current Selection
- This component always shows the active selection irrespective of how the selection was made i.e. using the dialog, or selection mechanisms provided by the views e.g. surface selection in 3D View, or row selection in Spreadsheet View.
- The Current Selection label is updated to indicate which data-producer:output-port is currently selected.
- Users can change Showing selected combo-box to view the selected cells or points.
- One of the major differences between this design and 4.0 release is that we will now support users to hightlight rows in this spreadsheet (by clicking on them). As rows are hightlighted, the Create Selection section will be updated to create a new query for selecting the hightlighted rows. Users can then hit Update Selection to create a new selection with only rows that highlighted. This provides a mechanism to edit a selection no matter how it was created.
Selection Display Properties
- These control the display properties for the selection in the active view.
- Any change to the selection color or label text properties i.e. label color, font, etc., are saved in settings so that they will be used as the default next time.
- Clicking the gear button will popup a modal dialog that will allow users to change advanced properties e.g. font size, font color, selection-wireframe size, etc. all of which will be saved to settings so they will be used by default the next time a new selection is created and preserved across multiple ParaView sessions.
Follow-on Actions
- These remain unchanged from before, allowing users to do something with the selection they created.
Q&A
1. What happens with Frustum selection?
- Frustum selection will be shown in the Current Selection section, just like other selections.
2. How does one invert a selection?
- We can add a button in the Follow-on Actions to Invert Selection the current selection.
3. What about making it easier to define selections e.g. "max of variable Temp"?
- That's a separate feature which can be accommodated after this refactoring. We will simply be updating the Create Selection section with additional capabilities.
4. How will I be able to label the points and cells of a selection now?
- The "Labels" combo-box will open up into a menu that allows checking multiple items. We can allow users to check up to 1 cell and point array at same time.
5. Will the edit dialog be available without python if I want to inspect selections?
- Yes. However in that case, users can only a few types of selections (those that won't require queries).
