SimpleITK/GettingStarted/A visual guide to SimpleITK in Java: Difference between revisions
m (moved A visual guide to SimpleITK in Java to SimpleITK/GettingStarted/A visual guide to SimpleITK in Java: Move under SimpleITK) |
No edit summary |
||
| (One intermediate revision by the same user not shown) | |||
| Line 1: | Line 1: | ||
{{SimpleITKMigrationHeader}} | |||
[[Image: Simpleitk_logo.png|center]] | |||
== Java == | == Java == | ||
Latest revision as of 18:18, 13 December 2019
| NOTICE |
| This page is being migrated to Read The Docs!
For the up to date version please see this page! |
Java
Java and SimpleITK are a natural fit. Like the bindings of other languages wrapped by SimpleITK, SimpleITK's Java bindings have a language-specific component (traditional Jar file), and a native component (native shared library). This combination requires a little more setup, but is largely transparent to the developer.
Eclipse setup
Download Eclipse and install it on the platform of your choice. Eclipse is a commonly used integrated development environment (IDE) for Java, and makes development, debugging and deployment particularly streamlined.
The first step in developing for SimpleITK's Java bindings is to create a new project in Eclipse. Simply choose File --> New --> Project..., choosing Java Project in the Eclipse project wizard dialog, and name the project as you like. In this example, our project is called SimpleITK Demo. Create a new class by choosing File --> New --> Class, or simply copy the code below and paste into the project item in the Package Explorer view and Eclipse will automatically create the class and hierarchy for you.
GaussianExample
Here is our first class Code/GaussianExample.java
package org.itk.simple.example;

import org.itk.simple.Image;
import org.itk.simple.SimpleITK;

public class GaussianExample {

	/**
	 * @param args
	 */
	public static void main(String[] args) {

		if (args.length < 2) {
			System.err.println("Usage: 'Gaussian <input> <output>'");
			System.exit(1);
		}
		System.out.println("Starting to blur " + args[0]);
		// Grab a file
		Image image = SimpleITK.readImage(args[0]);
		Image output = SimpleITK.discreteGaussian(image);
		SimpleITK.writeImage(output, args[1]);
		System.out.println("Finished blurring, writing to " + args[1]);

	}

}
If Eclipse is working as expected, you should see errors on lines 19-21. These errors occurs because we have not told Eclipse where to find SimpleITK's jar file.
Adding SimpleITK to the Build Path
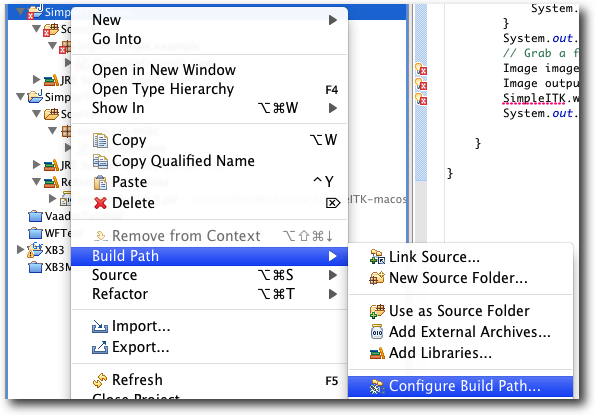
Right click on the project in the Package Explorer view and choose Build Path --> Configure Build Path....

Configure the Build Path for our Eclipse project
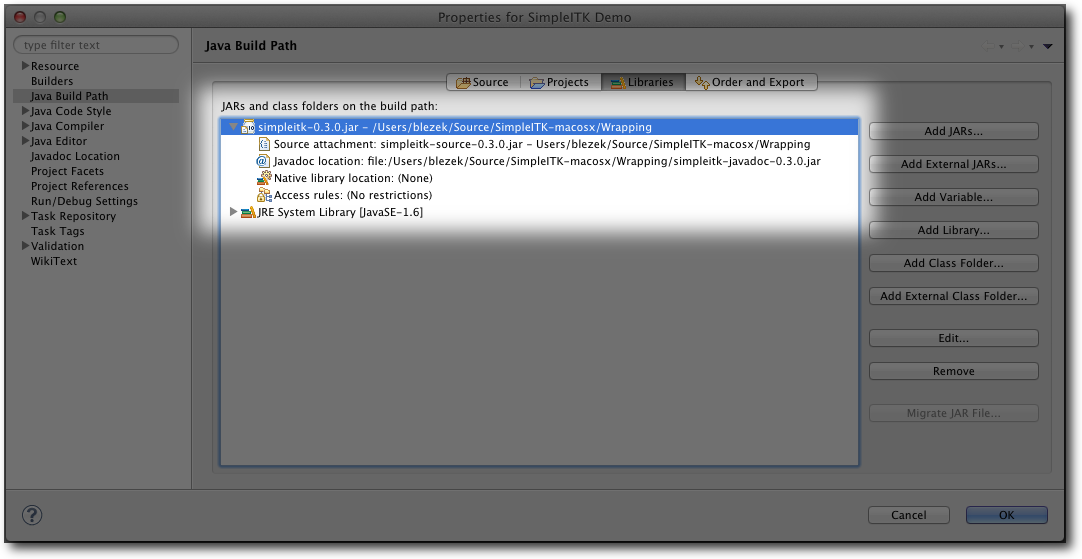
In the Properties dialog, click on Add External JARs... and navigate to the SimpleITK jar file. When selected, click the down arrow to expose the options for the jar.

The three options of interest are: Source attachment, Javdoc location and Native library location. The Source attachment specifies where the source code for the SimpleITK jar file resides. In our case, it is distributed as simpleitk-source.x.x.x.jar where x.x.x is the version number of SimpleITK. The source attachment is useful for debugging the SimpleITK library, if necessary, because it allows the debugger to step through classes provided in the SimpleITK jar file. This setting is optional.
The Javadoc location is also optional, but extremely helpful in developing with Java. Having Javadoc available provides Eclipse with in-line documentation for each function, if provided. We highly recommend supplying the Javadoc location to Eclipse.
The last option, Native library location is required. Because SimpleITK is a C++ library, all functionality is provided through the JNI (Java Native Interface) specification. When the SimpleITK classes are loaded, a static block loads the native library to provide all the functionality to Java. This option tells Eclipse where to search for the library; without it a UnsatisfiedLinkError is thrown:
  Exception in thread "main" java.lang.UnsatisfiedLinkError: no SimpleITKJava in java.library.path
	at java.lang.ClassLoader.loadLibrary(ClassLoader.java:1758)
	at java.lang.Runtime.loadLibrary0(Runtime.java:823)
	at java.lang.System.loadLibrary(System.java:1045)
	at org.itk.simple.SimpleITKJNI.<clinit>(SimpleITKJNI.java:62)
	at org.itk.simple.SimpleITK.readImage(SimpleITK.java:33)
	at org.itk.simple.example.GaussianExample.main(GaussianExample.java:19)
Set the Native library location to the directory containing the platform specific JNI library, i.e. libSimpleITKJava.jnilib on Mac OSX, libSimpleITKJava.so on Linux and SimpleITKJava.dll on Windows. After providing the library location, our example code runs correctly. When running this example from the command line, the native library location needs to be specified to the JVM, e.g. -Djava.library.path=/path/to/SimpleITKRuntime.
SimpleITK Java Conventions
The SimpleITK Java bindings closely follow the C++ conventions, i.e. each class contains the public member functions. However, the functional interface is handled differently in Java. In particular, every static Java function must belong to a class, unlike C++. In SimpleITK, the functional interface is contained in a class called org.itk.simple.SimpleITK. This class contains the functional interfaces as static member functions, i.e. org.itk.simple.SimpleITK.readImage as shown in the example. The naming conventions for all SimpleITK classes follows the C++ conventions, but member functions and the function interface follow the Java conventions of using CamelCase with the first letter lowercase. In Java, the C++ function ::itk::simple::ReadImage becomes org.itk.simple.SimpleITK.readImage.
