Bender/Documentation/2.0/Tutorial: Difference between revisions
m (Copied from Bender/Documentation/1.1/Tutorial) |
(Add 2.0 screenshots) |
||
| Line 1: | Line 1: | ||
= Video = | = Video = | ||
{| | {| | ||
|[[Image:Bender- | |[[Image:Bender-2.0-tutorial-video.png|link=http://vimeo.com/73247670|400px|Bender workflow tutorial]] | ||
| Links to tutorial sections: | | Links to tutorial sections: | ||
[[#Step_2:_Load_data|Load data]] -> [https://vimeo.com/73247670#t=0m16s 0:16] <br> | [[#Step_2:_Load_data|Load data]] -> [https://vimeo.com/73247670#t=0m16s 0:16] <br> | ||
[[#Step_3: | [[#Step_3:_Merge_and_resample|Merge labels]] -> [https://vimeo.com/73247670#t=0m28s 0:28]<br> | ||
[[#Step_3: | [[#Step_3:_Merge_and_resample|Resample image]] -> [https://vimeo.com/73247670#t=0m28s 0:28]<br> | ||
[[# | [[#Step_3:_Merge_and_resample|Pad image]] -> [https://vimeo.com/73247670#t=0m28s 0:28]<br> | ||
[[# | [[#Step_4:_Extract_materials|Create tetrahedral mesh]] -> [https://vimeo.com/73247670#t=0m32s 0:32]<br> | ||
[[# | [[#Step_4:_Extract_materials|Extract bone mesh]] -> [https://vimeo.com/73247670#t=0m32s 0:32]<br> | ||
[[# | [[#Step_4:_Extract_materials|Extract skin mesh]] -> [https://vimeo.com/73247670#t=0m34s 0:34]<br> | ||
[[# | [[#Step_5:_Define_rigging|Armature/Rig]] -> [https://vimeo.com/73247670#t=0m40s 0:40]<br> | ||
[[#Step_7: | [[#Step_6:_Skinning|Volume skinning]] -> [https://vimeo.com/73247670#t=0m50s 0:50]<br> | ||
[[#Step_8: | [[#Step_7:_Weights|Compute weights]] -> [https://vimeo.com/73247670#t=0m55s 0:55]<br> | ||
[[#Step_7:_Weights|Evaluate mesh]] -> [https://vimeo.com/73247670#t=1m00s 1:00]<br> | |||
[[#Step_7:_Weights|Apply materials]] -> [https://vimeo.com/73247670#t=1m00s 1:00]<br> | |||
[[#Step_8:_Pose_armature|Pose armature]] -> [https://vimeo.com/73247670#t=1m06s 1:06]<br> | |||
[[#Step_8:_Pose_armature|Simulate pose]] -> [https://vimeo.com/73247670#t=1m14s 1:15]<br> | |||
|} | |} | ||
| Line 19: | Line 23: | ||
Select "File->Download Sample Data" in the menu. | Select "File->Download Sample Data" in the menu. | ||
Select directory (with write access) and click the "Download data" button | Select directory (with write access) and click the "Download data" button | ||
[[Image:Bender-Tutorial- | [[Image:Bender-Tutorial-v2.0-DownloadSampleData.png|center|300px]] | ||
===Step 2: Load data=== | ===Step 2: Load data=== | ||
Go back to the Bender workflow module by clicking "Back" in the toolbar (or the "Bender" logo icon. | Go back to the Bender workflow module by clicking "Back" in the toolbar (or the "Bender" logo icon. | ||
Click the Volume folder button and select the downloaded "man-arm-2mm.mha" file | Click the Volume folder button and select the downloaded "man-arm-2mm.mha" file | ||
Click the Colors folder button and select the downloaded "Tissues- | Click the Colors folder button and select the downloaded "Tissues-v2.0.txt" file | ||
Validate the step by clicking "2/7 - | Validate the step by clicking the button "2/7 - Merge and resample" | ||
[[Image:Bender-Tutorial- | [[Image:Bender-Tutorial-v2.0-1A-Labelmap.png|center|300px]] | ||
===Step 3: | ===Step 3: Merge and resample=== | ||
Click the "Merge labels" button | Click the "Merge labels" button | ||
[[Image:Bender-Tutorial- | [[Image:Bender-Tutorial-v2.0-2A-MergeLabels.png|center|300px]] | ||
Click the "Generate bone model" button | Click the "Resample" button and then the "Pad" button | ||
[[Image:Bender-Tutorial- | [[Image:Bender-Tutorial-v2.0-2B-ResampleImage.png|center|300px]] | ||
Click the " | Validate the step by clicking "3/7 - Extract materials" | ||
[[Image:Bender-Tutorial- | ===Step 4: Extract materials === | ||
Validate the step by clicking " | Click the "Generate mesh" button | ||
===Step | [[Image:Bender-Tutorial-v2.0-3A-CreateTetrahedralMesh.png|center|300px]] | ||
Click "Select a Preset" and " | Click the "Extract bone model" button | ||
[[Image:Bender-Tutorial-v2.0-3B-ExtractBoneMesh.png|center|300px]] | |||
[[Image:Bender-Tutorial- | Click the "Extract skin model" button | ||
Validate the step by clicking " | [[Image:Bender-Tutorial-v2.0-3C-ExtractSkinMesh.png|center|300px]] | ||
===Step | Validate the step by clicking "4/7 - Create armature (rigging)" | ||
===Step 5: Define rigging === | |||
Click "Select a Preset" and "Arm-armature" from the menu | |||
{| align="center" | |||
|[[Image:Bender-Tutorial-v2.0-4A-Armatures-1.png|center|300px]] | |||
|[[Image:Bender-Tutorial-v2.0-4A-Armatures-2.png|center|300px]] | |||
|} | |||
Validate the step by clicking "5/7 - Skin armature to volume" | |||
===Step 6: Skinning=== | |||
Click the "Skin volume" button | Click the "Skin volume" button | ||
[[Image:Bender-Tutorial- | [[Image:Bender-Tutorial-v2.0-5A-VolumeSkinning.png|center|300px]] | ||
Validate the step by clicking " | Validate the step by clicking "6/7 - Compute weights" | ||
===Step | ===Step 7: Weights=== | ||
Click the "Compute weights" button | Click the "Compute weights" button | ||
Click the "Evaluate surface weight" button | Click the "Evaluate surface weight" button | ||
[[Image:Bender-Tutorial- | Click the "Apply material properties" button | ||
Validate the step by clicking " | [[Image:Bender-Tutorial-v2.0-6C-ApplyMaterials.png|center|300px]] | ||
===Step | Validate the step by clicking "7/7 - Pose armature (posing)" | ||
===Step 8: Pose armature=== | |||
[[Image:Bender-Tutorial- | Click the "camera" tool button and select the file "man-arm-biceps-curl-v2.0.bvh". In the dialog, select the frame #30 in Options and validate with the "Open" button. | ||
{| align="center" | |||
|[[Image:Bender-Tutorial-v2.0-7A-PoseArmature-1.png|center|300px]] | |||
Click the " | |[[Image:Bender-Tutorial-v2.0-7A-PoseArmature-2.png|center|300px]] | ||
[[Image:Bender-Tutorial- | |} | ||
Click the "Simulate pose" button and wait for the results to appear. | |||
[[Image:Bender-Tutorial-v2.0-7B-SimulatePose.png|center|300px]] | |||
Latest revision as of 13:36, 1 April 2014
Video

|
Links to tutorial sections:
Load data -> 0:16 |
Step by Step
Step 1: Download tutorial data
Select "File->Download Sample Data" in the menu. Select directory (with write access) and click the "Download data" button
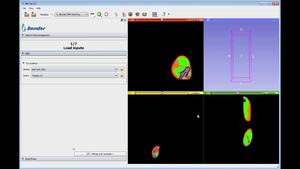
Step 2: Load data
Go back to the Bender workflow module by clicking "Back" in the toolbar (or the "Bender" logo icon. Click the Volume folder button and select the downloaded "man-arm-2mm.mha" file Click the Colors folder button and select the downloaded "Tissues-v2.0.txt" file Validate the step by clicking the button "2/7 - Merge and resample"
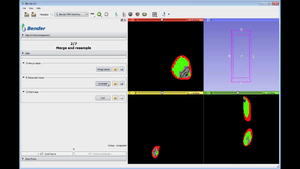
Step 3: Merge and resample
Click the "Merge labels" button
Click the "Resample" button and then the "Pad" button
Validate the step by clicking "3/7 - Extract materials"
Step 4: Extract materials
Click the "Generate mesh" button
Click the "Extract bone model" button
Click the "Extract skin model" button
Validate the step by clicking "4/7 - Create armature (rigging)"
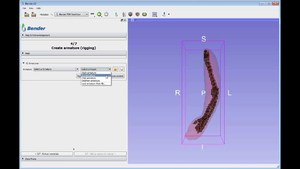
Step 5: Define rigging
Click "Select a Preset" and "Arm-armature" from the menu
Validate the step by clicking "5/7 - Skin armature to volume"
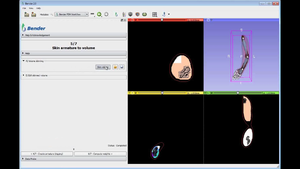
Step 6: Skinning
Click the "Skin volume" button
Validate the step by clicking "6/7 - Compute weights"
Step 7: Weights
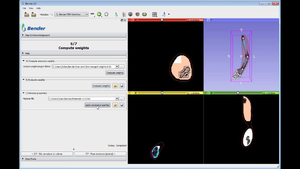
Click the "Compute weights" button Click the "Evaluate surface weight" button Click the "Apply material properties" button
Validate the step by clicking "7/7 - Pose armature (posing)"
Step 8: Pose armature
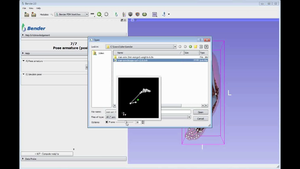
Click the "camera" tool button and select the file "man-arm-biceps-curl-v2.0.bvh". In the dialog, select the frame #30 in Options and validate with the "Open" button.
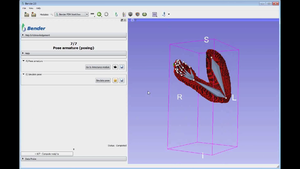
Click the "Simulate pose" button and wait for the results to appear.

