ParaView:Server Configuration
DEPRECATED WIKI
This page has been deprecated, all the updated information can be found here: https://docs.paraview.org/en/latest/ReferenceManual/parallelDataVisualization.html
Overview
Several sites have set of visualization clusters that are available to the users to connect to. These sites may want to provide a default set of server configurations available to the users. Additionally, there may be some options that may be needed to be specified before connecting to the server. All this can be managed using server configuration xmls. This document illustrates a few example use-cases.
Default Servers
When ParaView starts up, it looks for several server definition files in the following order:
- On Unix-based systems and Mac OS X
- default_servers.pvsc in the ParaView executable directory (you can do a ls -l /proc/<paraview PID here>/exe to identify the executable directory)
- /usr/share/ParaView/servers.pvsc
- $HOME/.config/ParaView/servers.pvsc
- On Windows
- default_servers.pvsc in the ParaView executable directory
- %COMMON_APPDATA%\ParaView\servers.pvsc
- %APPDATA%\ParaView\servers.pvsc
If the same server is defined in multiple files, the definition read last will overwrite any previous definition.
Use Cases
Case One: Simple server connection
In this use-case, we are setting a configuration for a simple server connection (to a pvserver processes) running on a node named "amber1", at port 20234. The pvserver process will be started manually by the user.
<source lang="xml">
 <Server name="case1" resource="cs://amber1:20234">
   <ManualStartup />
 </Server>
</source>
Here, resource identifies the type if the connection (cs -- implying client-server), host name and port. If the port number i.e. :20234 part is not specified in the resource, then the default port number (which is 11111) is assumed; Since the user starts pvserver processes manually, we use <ManualStartup /> tag.
Case Two: Server connection with user-specified port
This is the same as Case One except that we want to ask the user each time the port number to connect to the pvserver at.
<source lang="xml">
 <Server name="case2" resource="cs://amber1">
   <ManualStartup>
     <Options>
       <Option name="PV_SERVER_PORT" label="Server Port: ">
         <Range type="int" min="1" max="65535" step="1" default="11111" />
       </Option>
     </Options>
   </ManualStartup>
 </Server>
</source>
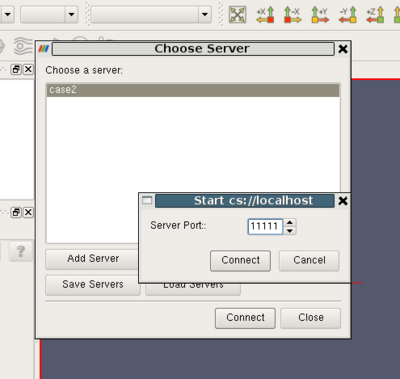
Here the only difference is the <Options/> element. This element is used to specify run-time options that the user specifies when connecting to the server. The Runtime Environment section defines some predefined variables that will be obtained from the user. In this case, we want to show the user an integral spin-box to select the port number, hence we use the <Range /> element to specify the type of the option. When the user connects to this server, he is shown a dialog similar to the following image:
Case Three: Simple connection to a data-server/render-server
This is the same as Case One, except that instead of a single server (i.e. pvserver) we are connecting to a separate render-server/data-server (pvrenderserver, pvdataserver) with data server running on port 20230 on amber1 and render server running port 20233 on node amber2
<source lang="xml">
 <Server name="case3" resource="cdsrs://amber1:20230//amber2:20233">
   <ManualStartup />
 </Server>
</source>
The only difference from case 1, is the resource specification. cdsrs indicates that it is a client-dataserver-renderserver configuration. The first host:port pair is the dataserver while the second one is the render server.
Case Four: Connection to a data-server/render-server with user specified server port
This is a combination of Case Two and Case Three, where we want to ask the user for the port number for both the render server and the data server.
<source lang="xml">
 <Server name="case4" resource="cdsrs://localhost//localhost">
   <ManualStartup>
     <Options>
       <Option name="PV_DATA_SERVER_PORT" label="Data Server Port: ">
         <Range type="int" min="1" max="65535" step="1" default="11111" />
       </Option>
       <Option name="PV_RENDER_SERVER_PORT" label="Render Server Port: ">
         <Range type="int" min="1" max="65535" step="1" default="22222" />
       </Option>
     </Options>
   </ManualStartup>
 </Server>
</source>
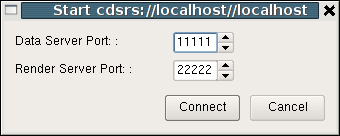
The XML is quite self-explanatory given what we have already seen. The options dialog produced by this XML looks as follows:
Case Five: Reverse Connection
By default the client connects to the server processes. However it is possible to tell the paraview client to wait for the server to connect to it instead. This is called a reverse connection. In such a case the server processes must be started with --reverse-connection or -rc flag.
To indicate reverse connection in the server configuration xml, the only change is suffixing the resource protocol part with "rc" (for reverse connection). eg.
 resource="csrc://localhost" -- connect to pvserver on localhost using reverse connection
 resource="cdsrsrc://localhost//localhost" -- connect to pvdataserver/pvrenderserver using reverse connection.
Case Six: Server connection including starting a pvserver
All the use-cases until now assumed that the user (or someone else) starts the server processes manually. That can be quite inconvenient. Fortunately, the server configuration is powerful enough to incorporate start of the server processes as well, as illustrated below:
<source lang="xml">
  <Server name="case6" resource="cs://localhost">
   <CommandStartup>
     <Options>
       <Option name="PV_SERVER_PORT" label="Server Port: ">
         <Range type="int" min="1" max="65535" step="1" default="11111" />
       </Option>
     </Options>
     <Command exec="/home/utkarsh/Kitware/ParaView3/ParaView3Bin/bin/pvserver"
              delay="5">
       <Arguments>
         <Argument value="-sp=$PV_SERVER_PORT$" />
       </Arguments>
     </Command>
   </CommandStartup>
 </Server>
</source>
In this case, the <ManualStartup/> element has been replaced by a <CommandStartup/> element, which contains <Command> elements which are the commands executed to start the server processes. Here, exec is the executable to run while delay indicates the time in seconds the client waits before attempting to connect to the server process. Command line arguments can be passed to the command executed using the <Arguments/> element. All runtime environment variables specified as $name$ are replaced with the actual values eg. in this case $PV_SERVER_PORT$ gets replaced by the port number chosen by the user in the options dialog.
Case Seven: Using connection-id
In many cases, a server cluster may be running different pvserver (or pvdataserver/pvrenderserver) processes for different users. In that case we need some level of authentication between the server and the client. This can be achieved (at a very basic level) with the connect-id option. If specified on the command line when starting the server processes (using --connect-id) then the server will allow only that client which reports the same connection id to connect.
This can be set up as follows: <source lang="xml">
<Server name="case7" resource="cs://localhost">
  <CommandStartup>
    <Options>
      <Option name="PV_CONNECT_ID" label="Connect ID" readonly="true">
        <Range type="int" min="1" max="65535" step="1" default="random" />
      </Option>
    </Options>
    <Command exec="/usr/bin/pvserver" delay="5">
      <Arguments>
        <Argument value="--connect-id=$PV_CONNECT_ID$" />
      </Arguments>
    </Command>
  </CommandStartup>
</Server>
</source>
In this case, the readonly attribute on the <Option/> indicates that the value cannot be changed by the user, it is only shown for information purposes. The default value for the PV_CONNECT_ID is set to random so that ParaView makes up a value at run time.
Case Eight: Starting server using ssh
In this use case the server process is spawned on some remote host using ssh. We want the user to be able to specify the ssh executable. We also want to preserve the ssh executable path across ParaView sessions so that the user does not have to enter it each time.
<source lang="xml">
 <Server name="case8" resource="cs://localhost:11111">
   <CommandStartup>
     <Options>
       <Option name="SSH_USER" label="SSH Username" save="true">
         <String default="utkarsh" />
       </Option>
       <Option name="SSH_EXE" label="SSH Executable" save="true">
         <File default="ssh" />
       </Option>
     </Options>
     <Command exec="$SSH_EXE$" delay="5">
       <Arguments>
         <Argument value="-L11111:amber5:11111" />
         <Argument value="amber5" />
         <Argument value="-l" />
         <Argument value="$SSH_USER$" />
         <Argument value="/usr/bin/pvserver" />
       </Arguments>
     </Command>
   </CommandStartup>
 </Server>
</source>
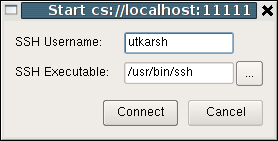
Note here that the value for the exec attribute is set to $SSH_EXE$ hence it gets replaced by the user selected ssh executable. We use the optional attribute save on the <Option/> element to tell ParaView to preserve the user chosen value across ParaView sessions so that the user doesn't have to enter the username and the ssh executable every time he wants to connect to this server.
Case Nine: Starting server using custom script with custom user-settable options
This example will illustrate the full capability of server configuration. Suppose we have a custom script "MyServerStarter" that takes in a bunch of arguments to start the server process. We want the user to be able to set up values for these arguments when he tries to connect to using this configuration. As an example, let's say MyServerStarter takes the following arguments:
- --use-offscreen -- to indicate use of offscreen rendering
- --use-onscreen -- to indicate on-screen rendering (this can be assumed from absence of --use-offscreen, but we are using it as an example)
- --session-name=<string> -- some string identifying the session
- --mpitype=<mpich1.2|mpich2|openmpi> -- choose between available MPI implementations
- --num-procs=<num> -- number of server processess
- --server-port -- port number passed the pvserver processes
All (except the --server-port) of these must be settable by the user at the connection time. This can be achieved as follows:
<source lang="xml">
 <Server name="case9" resource="cs://localhost">
   <CommandStartup>
     <Options>
       <Option name="OFFSCREEN" label="Use offscreen rendering">
         <Boolean true="--use-offscreen" false="--use-onscreen" default="false" />
       </Option>
       <Option name="SESSIONID" label="Session Identifier">
         <String default="session01"/>
       </Option>
       <Option name="MPITYPE" label="MPI Implementation">
         <Enumeration default="mpich1.2">
           <Entry value="mpich1.2" label="MPICH Ver. 1.2" />
           <Entry value="mpich2" label="MPICH Ver 2.0" />
           <Entry value="openmpi" label="Open MPI" />
         </Enumeration>
       </Option>
       <Option name="NUMPROC" label="Number Of Processes">
         <Range type="int" min="1" max="256" step="4" default="1" />
       </Option>
     </Options>
     <Command exec="/tmp/MyServerStarter" delay="5">
       <Arguments>
         <Argument value="--server-port=$PV_SERVER_PORT$" />
         <Argument value="--mpitype=$MPITYPE$" />
         <Argument value="--num-procs=$NUMPROC$" />
         <Argument value="$OFFSCREEN$" />
         <Argument value="--session-name=$SESSIONID$" />
       </Arguments>
     </Command>
   </CommandStartup>
 </Server>
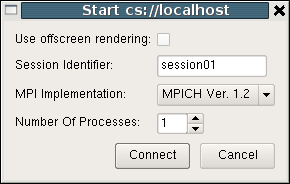
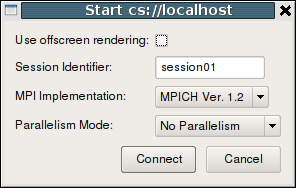
</source> Each <Option /> defines a new run-time variable that can be accessed as ${name}$ in the <Command /> section. When the user tries to connect using this configuration, he is shown the following options dialog:
This can be extended to start the server processes using ssh or any batch scheduler etc. as may be the required by the server administrator. This can also be set up to use reverse connection (by changing the protocol in the resource attribute).
Case Ten: Case Nine + Switch Statement
- Supported since 3.8 ***
This is same as Case Nine with one change: We no longer allow the user to choose the number of processes. In stead, the number of processes is automatically selected based on the value of the parallelism combo-box.
<source lang="xml">
 <Server name="case10" resource="cs://localhost">
   <CommandStartup>
     <Options>
       <Option name="OFFSCREEN" label="Use offscreen rendering">
         <Boolean true="--use-offscreen" false="--use-onscreen" default="false" />
       </Option>
       <Option name="SESSIONID" label="Session Identifier">
         <String default="session01"/>
       </Option>
       <Option name="MPITYPE" label="MPI Implementation">
         <Enumeration default="mpich1.2">
           <Entry value="mpich1.2" label="MPICH Ver. 1.2" />
           <Entry value="mpich2" label="MPICH Ver 2.0" />
           <Entry value="openmpi" label="Open MPI" />
         </Enumeration>
       </Option>
       <Option name="PARALLELISM" label="Parallelism Mode">
         <Enumeration default="noparallel">
           <Entry value="noparallel" label="No Parallelism" />
           <Entry value="someparallel" label="Some Parallelism" />
           <Entry value="highparallel" label="Highly Parallel" />
         </Enumeration>
       </Option>
       <Switch name="PARALLELISM">
         <Case value="noparallel">
           <Set name="NUMPROC" value="1" />
         </Case>
         <Case value="someparallel">
           <Set name="NUMPROC" value="2" />
         </Case>
         <Case value="highparallel">
           <Set name="NUMPROC" value="10" />
         </Case>
       </Switch>
     </Options>
     <Command exec="/tmp/MyServerStarter" delay="5">
       <Arguments>
         <Argument value="--server-port=$PV_SERVER_PORT$" />
         <Argument value="--mpitype=$MPITYPE$" />
         <Argument value="--num-procs=$NUMPROC$" />
         <Argument value="$OFFSCREEN$" />
         <Argument value="--session-name=$SESSIONID$" />
       </Arguments>
     </Command>
   </CommandStartup>
 </Server>
</source>
The Switch statement can only have Case statements as children, while the Case statement can only have Set statements as children. Set statements are not much different from Option except that the value is fixed and the user is not prompted to set that value.
Case Eleven: Launch pvserver on a cluster using PBS - use reverse connection to client
- Supported since 3.8 ***
Let's suppose you're travelling somewhere remotely and are connected back to your main facility over a wireless VPN connection. You'd like to lauch N pvservers on the cluster at your site, have them reverse connect to your laptop (and do remote rendering, just transferring the images back). We can make use of the scripts for cases 1-10 above, but we need one extra ingredient. Our local IP address - which will change every time we travel, or in the case of DHCP, potentially whenever we reboot. The procesure is as follows. Give the user a dialog which he/she can enter information such as number of nodes required, memory, time allocation and other parameters (all collected from above examples). Launch a script locally into which we pass these parameters, but the local script finds the IP address of our machine (laptop for example) and then ssh's into the remote machine and launches a job. To make this work, I have two scripts (windows/linux) one of which should be on the local machine. They may need tweaking if the machine in question has multiple NICs and the detected IP is the wrong one.
Windows - Save this file as : "find-ip.bat", for SSH the batch file calls plink.exe which we assume you have in your path
 rem ######################################
 rem Windows batch file find-ip.bat
 rem ######################################
 @echo off

 set IP=

 rem ######################################
 rem On windows 7 we might find IPv4
 rem ######################################

 IPCONFIG /all |FIND "IPv4" > %temp%\TEMPIP.txt
 FOR /F "tokens=2 delims=:" %%a in (%temp%\TEMPIP.txt) do set IP=%%a
 del %temp%\TEMPIP.txt

 rem ######################################
 rem If that gave nothing, use IP
 rem ######################################

 IF NOT DEFINED IP (
  IPCONFIG /all |FIND "IP" > %temp%\TEMPIP.txt
  FOR /F "tokens=2 delims=:" %%a in (%temp%\TEMPIP.txt) do set IP=%%a
  del %temp%\TEMPIP.txt
 )

 rem ######################################
 rem Remove 1 space at start of string
 rem ######################################
 set IP=%IP:~1%

 rem ######################################
 rem Remove (Preferred) from IPv4 string
 rem ######################################
 SET ip_string=%IP%
 SET ip_cleaned=%ip_string:(Preferred)=%
 set IP=%ip_cleaned%

 echo "This ip address is %IP%
 echo.
 echo "CALLING plink %1 -l %2 %3 %IP% %5 %6 %7 %8 %9"
 echo.

 plink %1 -l %2 %3 %IP% %5 %6 %7 %8 %9
If using linux, then you can use the following script : "find-ip.sh", linux example uses ssh as usual.
 #!/bin/bash
 # IP1=`/sbin/ifconfig eth0 | grep inet | sed -n 's/^\s*inet addr://p' | awk '{ print $1 }'`
 # echo $IP1
 IP=`host \`hostname\` | sed 's/.*has address //g'`
 echo $IP

 echo "Calling ssh $1 -l $2 $3 $IP $5 $6 $7 $8 $9"

 ssh $1 -l $2 $3 $IP $5 $6 $7 $8 $9
Now the two local scripts above must ssh into the remote machine (one of the paramters of our pvsc file which is shown below).
 <Server name="Reverse-JobScript" resource="csrc://localhost">
   <CommandStartup>
     <Options>
       <Option name="MACHINE" label="Remote Machine" save="true">
         <String default="eiger.cscs.ch"/>
       </Option>
       <Option name="SSH_USER" label="SSH Username" save="true">
         <String default="biddisco"/>
       </Option>
       <Option name="SSH_EXE" label="SSH Executable" save="true">
         <File default="/d/Code/plugins/Icarus/scripts/find-ip.bat"/>
       </Option>
       <Option name="CLIENTNAME" label="The ip address or name of this client machine">
         <String default="INTENTIONALLY BLANK"/>
       </Option>
       <Option name="REMOTESCRIPT" label="The remote script that generates the job submission">
         <String default="/users/biddisco/eiger/submit-pvserver-gl.sh"/>
       </Option>
       <Option name="PV_SERVER_PORT" label="Server Port: ">
         <Range type="int" min="1" max="65535" step="1" default="11111"/>
       </Option>
       <Option name="NUMPROC" label="Number Of Processes" save="true">
         <Range type="int" min="1" max="256" step="4" default="32"/>
       </Option>
       <Option name="MEMORY" label="Memory (GB) per mpi-task" save="true">
         <Range type="int" min="1" max="48" step="2" default="2"/>
       </Option>
       <Option name="NUMHOURS" label="Number Of Hours to reserve" save="true">
         <Range type="int" min="1" max="72" step="2" default="12"/>
       </Option>
       <Option name="SESSIONID" label="Session Identifier">
         <String default="PV-Remote"/>
       </Option>
     </Options>
     <Command exec="$SSH_EXE$" delay="5">
       <Arguments>
         <Argument value="$MACHINE$"/>
         <Argument value="$SSH_USER$"/>
         <Argument value="$REMOTESCRIPT$"/>
         <Argument value="$CLIENTNAME$"/>
         <Argument value="$PV_SERVER_PORT$"/>
         <Argument value="$NUMPROC$"/>
         <Argument value="$MEMORY$"/>
         <Argument value="$NUMHOURS$"/>
         <Argument value="$SESSIONID$"/>
       </Arguments>
     </Command>
   </CommandStartup>
 </Server>
The CLIENTNAME parameter is not used as our local script finds the IP address and inserts it for us. This can be deleted. In fact since we use ssh keys for authentication, the username could be removed too.
Notice that the Parameter "REMOTESCRIPT" points to "/users/biddisco/eiger/submit-pvserver-gl.sh" - this is the script on the remote machine which accepts the long string of parameters and converts them into a qsub command and actually submits the job. The file "submit-pvserver-gl.sh" on my machine is as follows. It sets up paths for my particular build of paraview, and launches the job. Notice how reverse connection uses the parameter passed from the host machine. It works from anywhere and finds you - Nice!
By changing the name of the script run in "REMOTESCRIPT", one can switch between different build of paraview from the remote client (mesa/GL/special plugins/other). Paths will need to be adjusted accordingly. But the principle is sound.
 #!/bin/bash

 echo "Usage : Client ip/hostname, Port, Num-mpi-procs, Mem-per-core, Hours neededi, Session name"

 echo "List of temporary files : "

 TEMP_FILE="/tmp/qsub-script.$RANDOM.pbs"
 echo $TEMP_FILE # show file name

 echo "#PBS -N $6"                                                     >> $TEMP_FILE
 echo "#PBS -m abe"                                                    >> $TEMP_FILE
 echo "#PBS -M biddisco@cscs.ch"                                       >> $TEMP_FILE
 echo "#PBS -l select=$3:ncpus=1:mpiprocs=1:mem=${4}gb:gpu=geforce"    >> $TEMP_FILE
 echo "#PBS -l place=free"                                             >> $TEMP_FILE
 echo "#PBS -l walltime=$5:00:00"                                      >> $TEMP_FILE
 echo "#PBS -l cput=$5:00:00"                                          >> $TEMP_FILE
 echo "#PBS -q restricted@eiger170"                                    >> $TEMP_FILE
 echo "#PBS -r n"                                                      >> $TEMP_FILE
 echo ""                                                               >> $TEMP_FILE
 echo "setenv LD_LIBRARY_PATH /scratch/eiger/biddisco/build/gl-pv/bin" >> $TEMP_FILE
 echo "setenv DISPLAY DISPLAY=:0.0"                                    >> $TEMP_FILE
 echo "setenv MV2_SUPPORT_DPM 1"                                       >> $TEMP_FILE
 echo ""                                                               >> $TEMP_FILE

 echo "mpiexec.hydra -rmk pbs /scratch/eiger/biddisco/build/gl-pv/bin/pvserver -rc -ch=$1 --server-port=$2 --use-offscreen-rendering -display :0.0" >> $TEMP_FILE

 # display the job submission
 cat $TEMP_FILE

 # submit the job
 /opt/pbs/default/bin/qsub $TEMP_FILE

 # wipe the temp file
 rm $TEMP_FILE
XML Schema
This default_server.pvsc is an xml file describing either the available server configurations. The structure of this xml is as follows:
- The <Servers> tag is the root element of the document, which contains zero-to-many <Server> tags.
- Each <Server> tag represents a configured server:
- The "name" attribute uniquely identifies the server configuration, and is displayed in the user interface.
- The "resource" attribute specifies the type of server connection, server host(s) and optional port(s) for making a connection. Values are
- cs://<host>:<port> - for client-pvserver configurations with forward connection i.e. client connects to the server
- csrc://<host>:<port> - for client-pvserver configurations with reverse connection i.e. server connects to the client
- cdsrs://<ds-host>:<ds-port>//<rs-host>:<rs-port> - for client-pvdataserver-pvrenderserver configurations with forward connection
- cdsrsrc://<ds-host>:<ds-port>//<rs-host>:<rs-port> - for client-pvdataserver-pvrenderserver configurations with reverse connection
- The <CommandStartup> tag is used to run an external command to start a server.
- An optional <Options> tag can be used to prompt the user for options required at startup.
- Each <Option> tag represents an option that the user will be prompted to modify before startup.
- The "name" attribute defines the name of the option, which will become its variable name when used as a run-time environment variable, and for purposes of string-substitution in <Argument> tags.
- The "label" attribute defines a human-readable label for the option, which will be used in the user interface.
- The optional "readonly" attribute can be used to designate options which are user-visible, but cannot be modified.
- The optional "save" attribute can be used to indicate that the value choosen by the user for this option will be saved in the registry so that it's preserved across ParaView sessions.
- A <Range> tag designates a numeric option that is only valid over a range of values.
- The "type" attribute controls the type of number controlled. Valid values are "int" for integers and "double" for floating-point numbers, respectively.
- The "min" and "max" attributes specify the minimum and maximum allowable values for the option (inclusive).
- The "step" attribute specifies the preferred amount to increment / decrement values in the user interface.
- The "default" attribute specifies the initial value of the option.
- As a special-case for integer ranges, a default value of "random" will generate a random number as the default each time the user is prompted for a value. This is particularly useful with PV_CONNECT_ID.
- A <String> tag designates an option that accepts freeform text as its value.
- The "default" attribute specifies the initial value of the option.
- A <File> tag designates an option that accepts freeform text along with a file browse button to assist in choosing a filepath
- The "default" attribute specifies the initial value of the option.
- A <Boolean> tag designates an option that is either on/off or true/false.
- The "true" attribute specifies what the option value will be if enabled by the user.
- The "false" attribute specifies what the option value will be if disabled by the user.
- The "default" attribute specifies the initial value of the option, either "true" or "false".
- An <Enumeration> tag designates an option that can be one of a finite set of values.
- The "default" attribute specifies the initial value of the option, which must be one of its enumerated values.
- Each <Entry> tag describes one allowed value.
- The "name" tag specifies the value for that choice.
- The "label" tag provides human-readable text that will be displayed in the user interface for that choice.
- Each <Option> tag represents an option that the user will be prompted to modify before startup.
- A <Command> tag is used to specify the external command and its startup arguments.
- The "exec" attribute specifies the filename of the command to be run. The system PATH will be used to search for the command, unless an absolute path is specified. If the value for this attribute is specified as $STRING$, then it will be replaced with the value of a predefined or user-defined (through <Option/>) variable.
- The "timeout" attribute specifies the maximum amount of time (in seconds) that the client will wait for the server to start (currently not implemented).
- The "delay" attribute specifies a delay (in seconds) between the time the startup command completes and the time that the client attempts a connection to the server.
- <Argument> tags are command-line arguments that will be passed to the startup command.
- String substitution is performed on each argument, replacing each $STRING$ with the value of a predefined or user-defined variable.
- Arguments whose value is an empty string are not passed to the startup command.
- An optional <Options> tag can be used to prompt the user for options required at startup.
- The <ManualStartup> tag indicates that the user will manually start the given server prior to connecting.
- An optional <Options> tag can be used to prompt the user for options required at startup. Note that PV_SERVER_PORT, PV_DATA_SERVER_PORT, PV_RENDER_SREVER_PORT, and PV_CONNECT_ID are the only variables that make sense in this context.
- Other startup type tags may be added in the future to support e.g: builtin SSH client functionality.
Runtime Environment
When a startup command is run, its environment will include all of the user-defined variables specified in <Option> tags, plus the following predefined variables:
- PV_CONNECTION_URI
- PV_CONNECTION_SCHEME
- PV_CLIENT_HOST
- PV_CLIENT_PLATFORM (valid values are: "Windows", "Apple", "Linux", "Unix", "Unknown")
- PV_SERVER_HOST
- PV_SERVER_PORT
- PV_DATA_SERVER_HOST
- PV_DATA_SERVER_PORT
- PV_RENDER_SERVER_HOST
- PV_RENDER_SERVER_PORT
- PV_USERNAME (currently not implemented)
- PV_CONNECT_ID
- PV_VERSION_MAJOR (e.g. "3")
- PV_VERSION_MINOR (e.g. "11")
- PV_VERSION_PATCH (e.g. "1")
- PV_VERSION (e.g. "3.11")
- PV_VERSION_FULL (e.g. "3.11.1")
If an <Option> tag defines a variable with the same name as a predefined variable, the <Option> tag value takes precedence. This can be used to override defaults that are normally hidden from the user. As an example, if a site wanted users to be able to override default port numbers, the server configuration might specify an <Option> of PV_SERVER_PORT.
